The window
What every part of the TranceTools window does, in Simple and in Pro. The app and the plugin share the same window; where they differ, it says so.
Overview
The window has four areas: the top bar along the top, the lanes (one per part) filling the middle, the inspector on the right in Pro, and the status bar along the bottom. Above the lanes, the ruler shows the bars and chords.
The launch screen
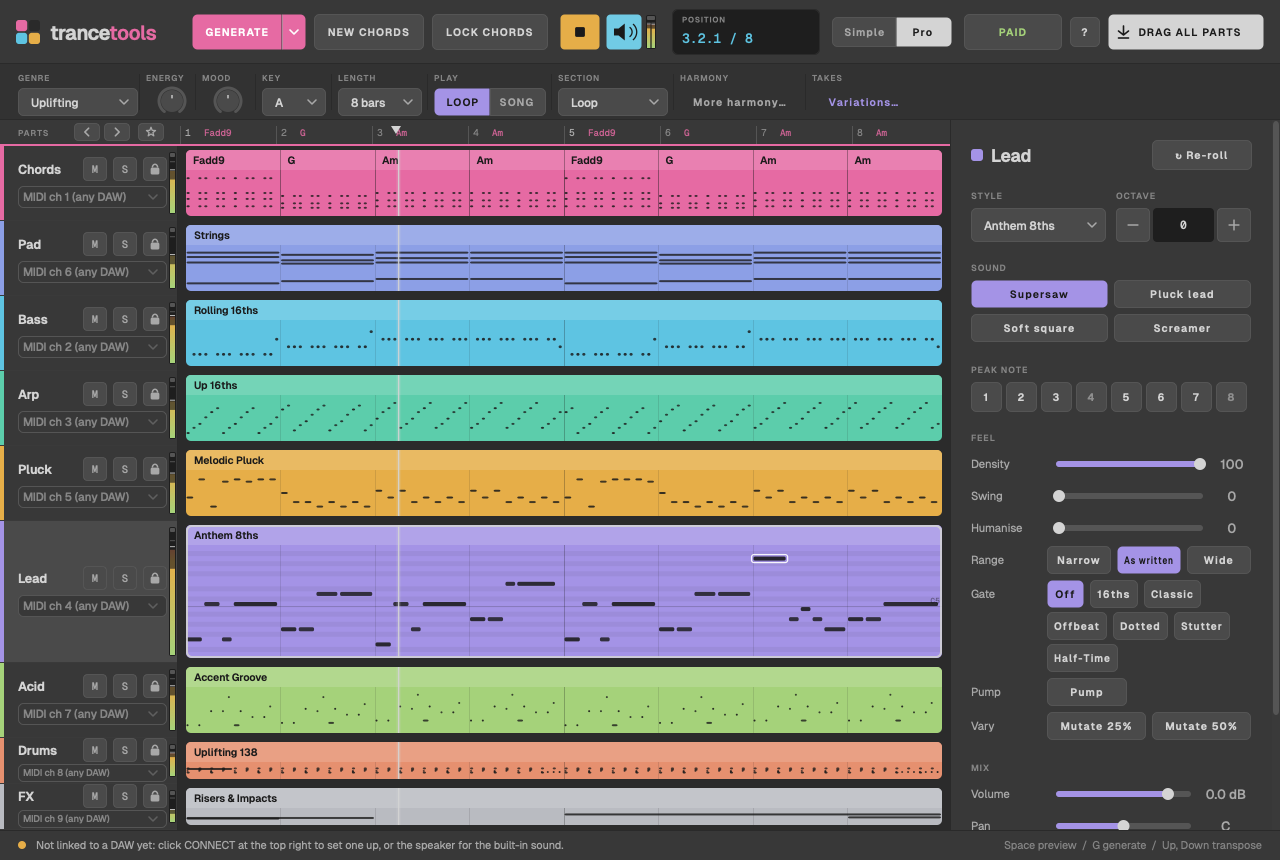
In Simple, and the very first time you open TranceTools, the app opens on the launch screen: "What are we making tonight?"
- Genre cards: Uplifting, Progressive, Psy, Tech, Vocal, Hard Trance, Classic 90s and Surprise me.
- Energy and Mood knobs. Double-click either one to put it back in the middle.
- Parts: chips for the parts the idea starts with. Chords, Bass, Arp, Lead and Drums are on to start with; click + Pad, + Pluck, + Acid or + FX to add more.
- Make me a trance idea (or Return): writes the idea in that genre and starts playing it.
- Hearing it on: the built-in sound or your DAW, or Set Up a DAW….
- Your ideas: opens your saved ideas (the button shows how many you have). Until you've saved one, it says Example ideas and opens the 24 built-in examples. See Example ideas.
- Open the full editor: skips the launch screen and goes straight to Pro.
Press Esc to close it. File > Start Screen… brings it back at any time, in the plugin too.
Simple and Pro
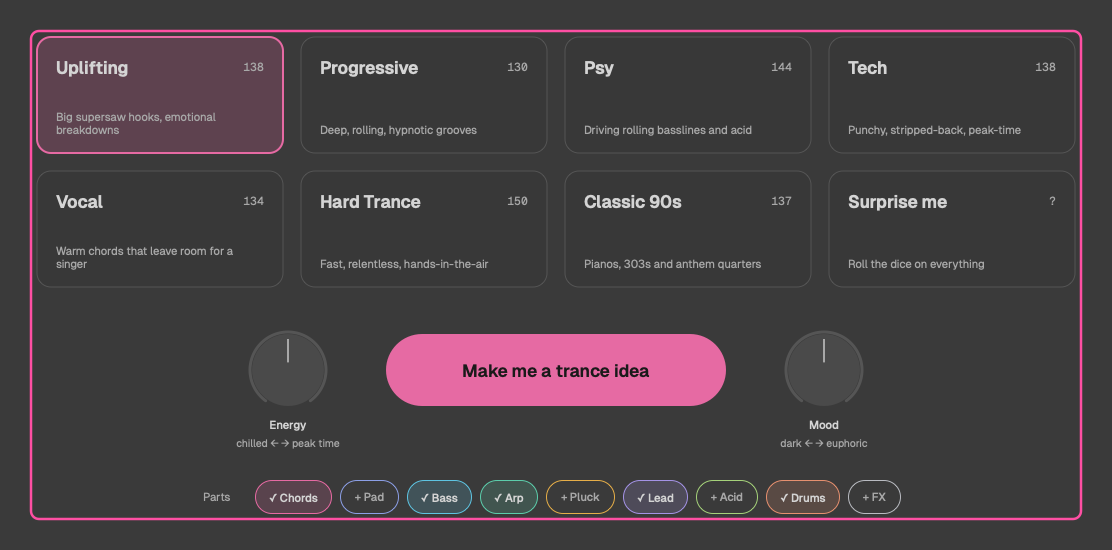
Simple and Pro are two views of the same idea. Switch with the Simple and Pro buttons in the top bar, or View > Simple / View > Pro. Your choice is remembered, and it's shared by the app and the plugin.
| Simple | Pro | |
|---|---|---|
| Top bar | Generate, genre chips, key, Energy, Mood, Lock Chords, Loop/Song, Hear As, Drag All | Every control, including New Chords, Length, Section and More harmony |
| Lanes | Name, style, lock and re-roll | Colour strip, name, mute, solo and lock; click for the inspector |
| Inspector | None | The selected part's settings, on the right |
| History arrows | Hidden (use ⌘Z and ⇧⌘Z) | < and > above the lanes, with the favourite star |
| Song arranging | Show and re-roll sections | Also move, duplicate, insert and remove them |
New users start in Simple. If you had a licence, saved favourites or a saved session from an earlier version, you start in Pro.
The top bar
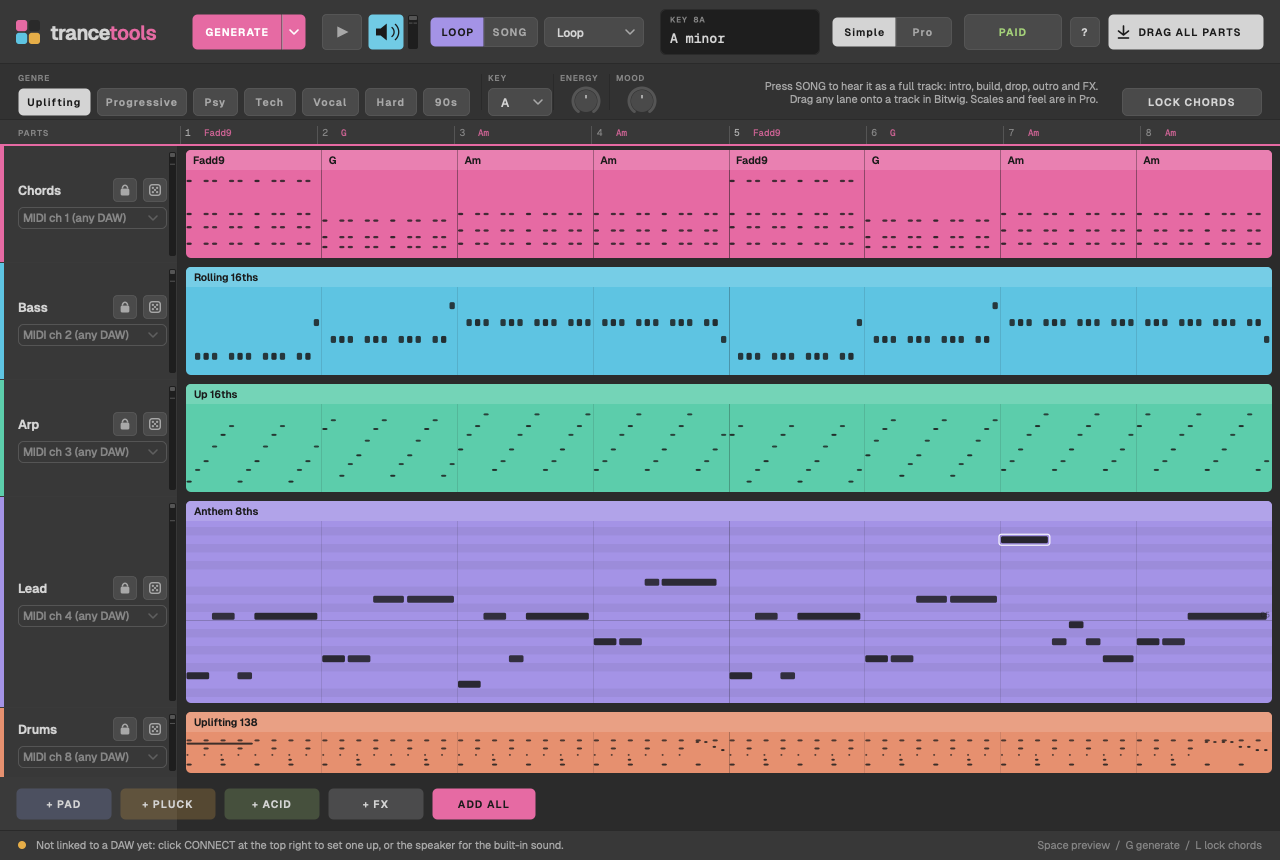
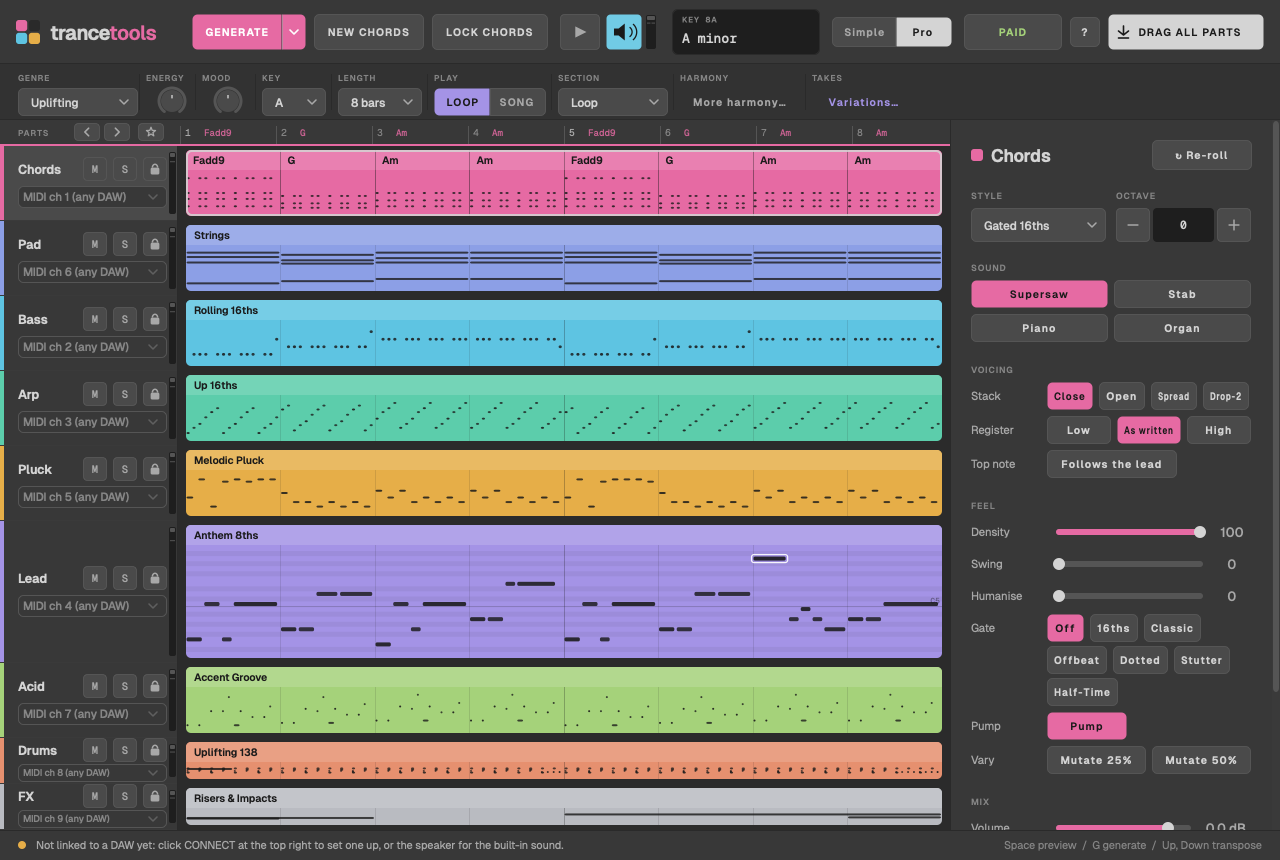
From left to right. On a narrower window, Pro moves Genre, Energy, Mood, Key, Length, Section and More harmony into a second row under the bar.

Generate
A new idea for every part you haven't locked (G). The ▾ beside it opens Generate everything (⇧ G) and Surprise me. See Generate and New Chords.
New Chords Pro only
A new chord progression. Unlocked parts are rewritten to follow it.
Lock Chords
Keeps the chord progression while Generate rolls the other parts (L). The chord names show on the ruler while it's on.
Play
Starts and stops the preview (Space). In the plugin, TranceTools plays along with your DAW's transport anyway; Play runs it while the DAW is stopped.
Speaker
Turns the built-in sound on or off. Click it for a menu: the built-in sound and its output, your DAW, or Set Up a DAW…. Right-click it for Audio Output… App only. See Sounds and audio output.
LOOP / SONG
Loop plays the idea round and round. Song plays it as a whole track, intro to outro. In Simple, the switch sits by the transport; in Pro, it's in the idea's row next to Section. See Sections and the song timeline.
Hear As (Simple) and Section (Pro)
Plays the loop as one section of the song: the intro, breakdown, build, drop or outro. Section in Pro also has Whole Song.
Genre
Chips in Simple, a menu in Pro. Choosing a genre sets the tempo, scale, progression, chord colour and every part's style and feel, then writes a fresh idea.
Energy and Mood
Two knobs: sparse to busy, and dark to euphoric. Double-click to reset to the middle. See Energy and Mood.
Key
The idea's key. Changing it moves the current idea to the new key without rewriting it.
Length Pro only
4, 8 or 16 bars.
More harmony Pro only
A pop-over with the scale, chord rate, progression, chord colour, bass pedal, the final drop's lift and transpose. See Chords, harmony and melody.
Variations Pro only
Opens the variation grid. See the variation grid.
The readout
The play position (for example 3.2.1 / 8 in the loop, or 33.1.1 / 144 bars in the Song), the key with its Camelot code (for example KEY 8A for A minor), the tempo, the chords and the DAW link. When no DAW is linked, the link cell says CONNECT: click it to set one up. On a narrow window it drops cells to fit; the key always stays, and while playing, the position can take its place. With no DAW linked, click the tempo to set it.
Drag All
Drag it onto your DAW to drop every part in as one multi-track MIDI file. Its label says what it will drag: DRAG ALL PARTS, DRAG THE DROP, DRAG THE SONG and so on.
?
Opens the help overlay. See Help on screen.
Simple, Pro and the licence button
Switch views. The licence button says ACTIVATE until you activate, then shows your licence.
MENU Plugin only
The plugin has no menu bar, so its File, Idea and View menus, plus Licence, Buy and the website, are under the MENU button.
The lanes
Each part has a lane showing its notes across the loop. In Pro, each lane's header has:
- a colour strip and the part's name;
- under the name, where it plays: the DAW track or MIDI channel for this part. See Where each part plays;
- Mute and Solo, to choose what you hear;
- Lock, so Generate leaves the part alone.
Click a header or a lane to put that part in the inspector. In Simple, each lane shows the part's name, where it plays, and its lock and re-roll buttons; the part's style is on its clip.
The Lead's lane is the tallest, so you can read the melody. Parts a section leaves out show as a note in the lane rather than going blank.
Working in a lane
- Drag a lane onto a DAW track to drop it in as a MIDI clip.
- Right-click a bar to re-roll just that bar, or, on the Lead, to choose which bar its peak note lands in.
- Shift-drag across bars to re-roll a range, in one part or every unlocked part.
- Click a note to delete it. Right-click a Lead note for Make This the Peak.
- Right-click a lane for Use [Part] From…, to bring the part back from an earlier idea.
These edits work on the loop; in a section or the Song, the menu tells you to go back to the loop first.
Adding and removing parts
The bar under the lanes adds parts that aren't in the idea yet (+ PAD, + FX and so on) or ADD ALL. New parts are written to fit what's already there. In Pro, the inspector's remove button takes a part out again.
The ruler
Above the lanes, the ruler shows bar numbers and the chords. Hover over a chord to see what it does in the key and how many notes it shares with the chord before it. Click a chord to change it; see Changing a chord.
In a long song, the ruler numbers every 2nd, 4th or 8th bar so it stays readable, and keeps the song's bar numbers when you show one section.
The inspector Pro only
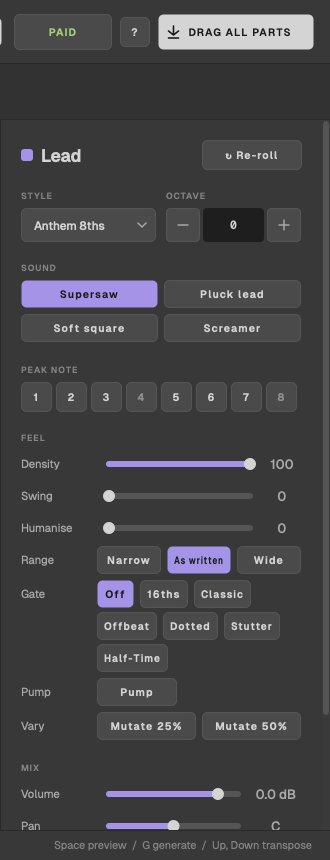
The inspector down the right holds everything for the selected part. What it shows depends on the part:
- Style, Octave and Re-roll. See The nine parts.
- Peak bar (Lead only): the bar the melody's highest note lands in.
- Feel: density, swing, humanise, range, trance gate and pump. See Feel.
- Voicing (Chords only). See Chord voicing.
- Mutate 25% and 50%.
- Sound (Kit for the drums) and Mix (volume and pan). See Sounds.
- Earlier ideas: the last four earlier ideas with a different version of this part, with Use From.
- Remove: takes the part out of the idea.
The status bar
The dot on the left is green when TranceTools is linked to a DAW (or running as a plugin) and amber when it isn't. Next to it, the status bar says what's linked, how many tracks it sees and the tempo, or what to do if something needs setting up. Messages, like where an export went, appear here too. On the right it lists the main shortcuts.
Until you activate, it also says Preview mode: activate to drag into your DAW.
Playhead and meters
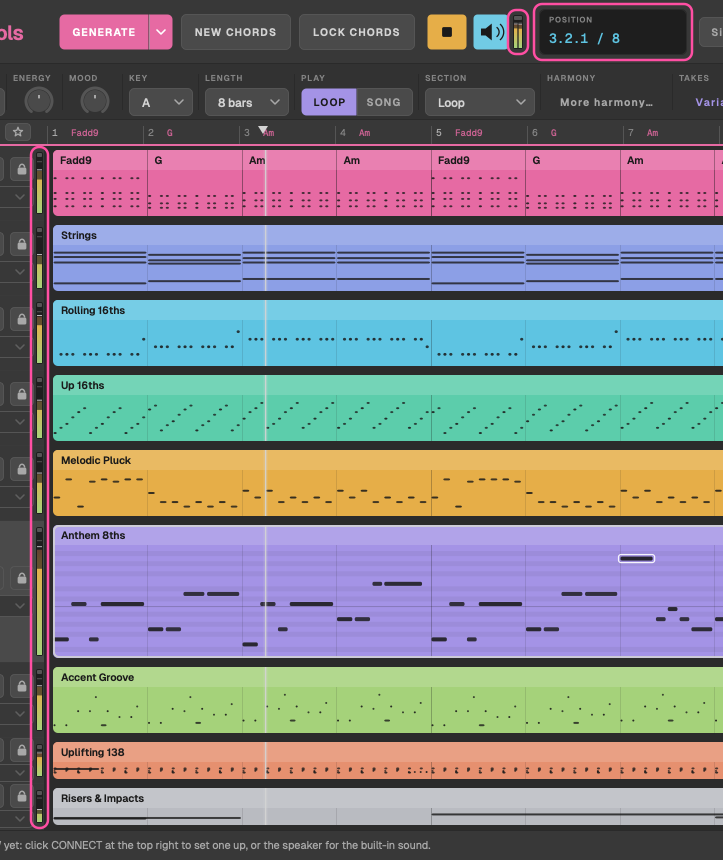
While TranceTools plays, a playhead line runs across the lanes, and the readout's first cell shows the position: bar, beat and 16th, plus the length when there's room (3.2.1 / 8, or 87.1.1 / 144 bars in the Song).
Each lane header has a level meter for that part, and the output has one beside the speaker. Meters show the peak and average level, hold the peak briefly, and light up if the level clips. They measure the built-in sound, after each part's volume and pan; a part playing on a DAW track shows on DAW instead.
Help on screen
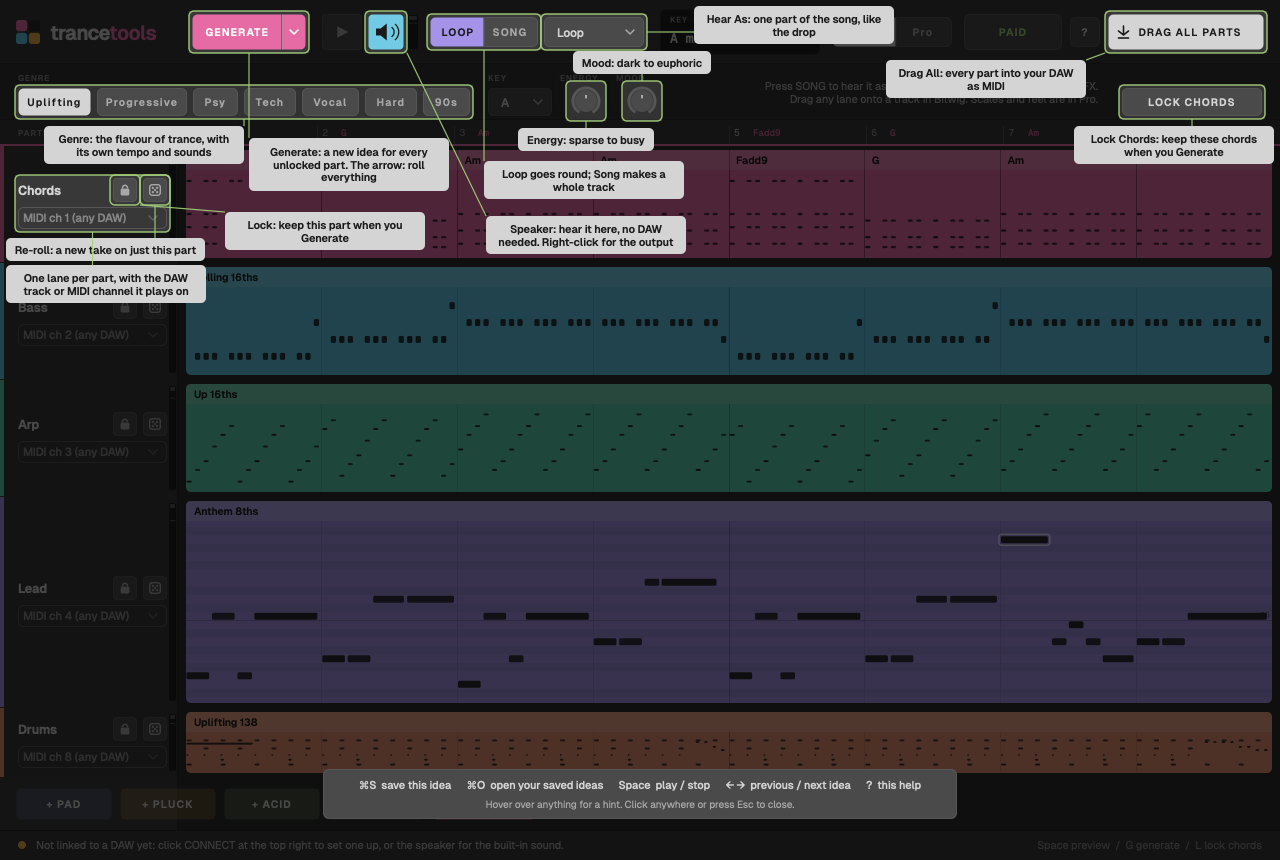
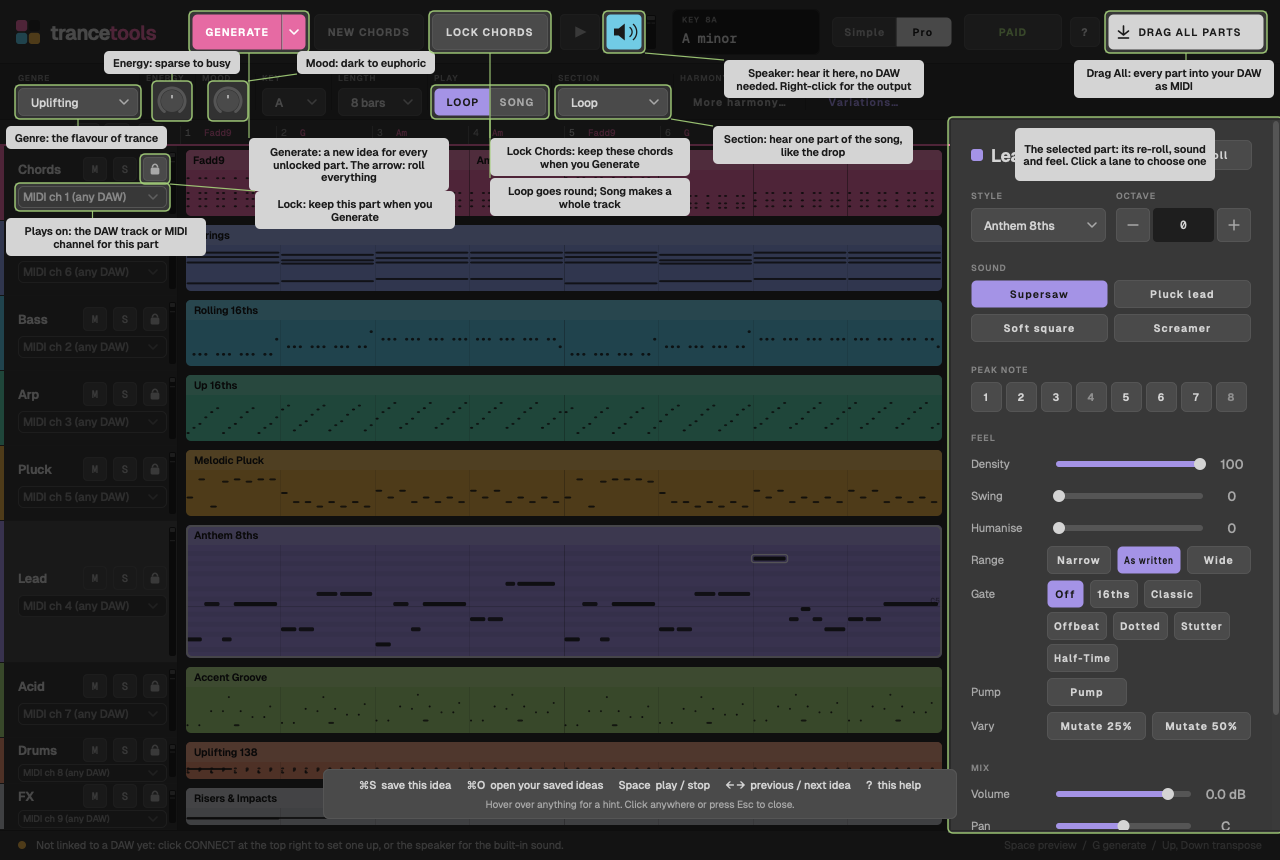
Click ? in the top bar, press ?, or choose Help > Show Help Overlay (in the plugin, MENU > Help). The screen dims and every main control gets a short label, with a card of keyboard shortcuts along the bottom. Click, or press Esc, Return or ?, to close it.
The first time you use Song, drag a part out, re-roll or lock a part, a one-line tip appears by the control, once. Turn tips off with Help > Show Tips, or bring them all back with Help > Reset Tips.
Zoom and window size
View > Zoom scales the whole window: 75%, 100%, 125%, 150% or 200%. Zooms too big for your screen are greyed out. The app reopens at the size and zoom you left it, and each plugin instance remembers its own in your project. In the plugin, Zoom is under MENU > View.