1. Install the app
Open the download and drag TranceTools Arrange to Applications. Then open it.
2. Install the Live script
Arrange talks to Live through a Live script (a Control Surface). In the Arrange window, click Install the Live script. It goes into your Live User Library, under Remote Scripts.
Then open Ableton Live 12, or restart it if it was already open, so it finds the script.
3. Choose it in Live's settings
In Live, open Live › Settings (Cmd+,) and go to Tempo & MIDI (Link, Tempo & MIDI in earlier versions of Live 12). In the Control Surface list, choose TranceTools Arrange in an empty slot, with Input and Output both set to None.
Back in Arrange, the top of the window says Linked to Ableton Live, with your set's tempo. If it still says Not linked to Live, check the Control Surface is set; if TranceTools Arrange isn't in the list, restart Live.
Tip: if you also use TranceTools, it has its own Control Surface. Both can be set at once, in different slots.
4. Put your loop in Session View
Arrange needs a loop to work from. In Live's Session View, put your loop in one row (a scene): a clip on each track, such as kick, bass, lead and pad.
In Arrange, pick that row from the Scene menu. The menu shows how many clips each row holds. A track with no clip in that row uses its first clip. Your tracks appear in Arrange by themselves: it looks at your set again every few seconds.
No loop yet? Make one in TranceTools, then drag each part onto a clip slot in the same row.
5. Check the roles
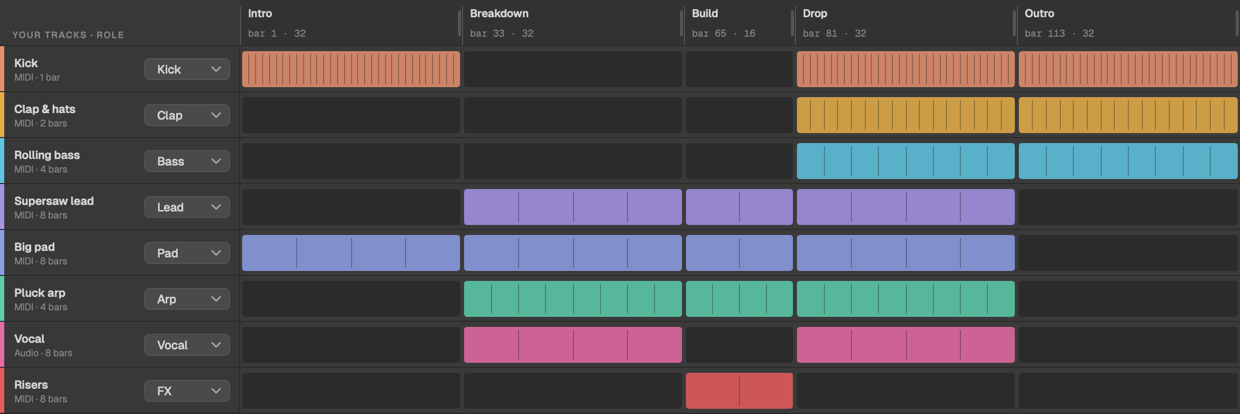
Each track gets a role, guessed from its name: Kick, Bass, Lead, Pad, Arp, Pluck, Chords, Acid, Perc, Hats, Clap, FX, Vocal, Atmos or Other. The role decides which sections the track plays in. If one's wrong (a track called "Synth 3" won't tell Arrange much), click it and choose another.
6. Pick a layout
Choose one of three:
- A genre. Seven templates, from Uplifting (138 BPM, 144 bars) to Hard Trance and Classic 90s. Each lays out an intro, breakdown, build, drop and outro.
- A reference track. Click Open a layout from Phrasemap and choose the MIDI file or Ableton set you exported from Phrasemap. Arrange uses that track's sections.
- Your own. Drag a section's right edge in the ruler to change where it ends (8 bars at a time; hold Alt for 4, Shift for 1). Click a section to rename, split, join or remove it.
In the grid, each cell is a track in a section. Click a cell to switch that track on or off there.
7. Choose the movement and extras
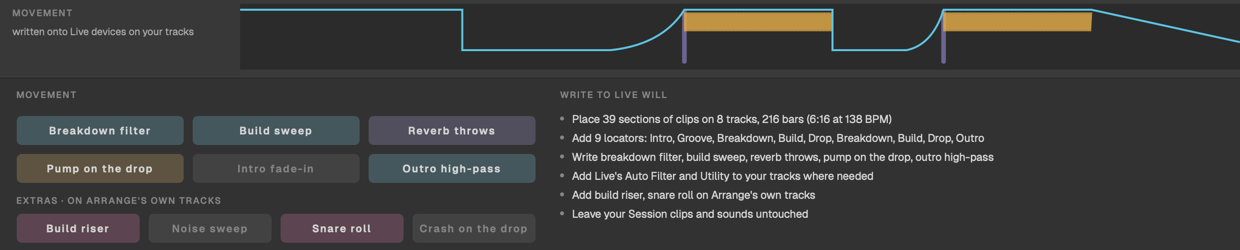
Movement is written onto Live devices on your tracks. All six moves start on; click one to leave it out: Breakdown filter, Build sweep, Reverb throws, Pump on the drop, Intro fade-in and Outro high-pass.
The reverb throws turn up send A, so put a reverb on return track A to hear them.
Extras go on Arrange's own tracks, and start off: Build riser (needs the TranceTools Build plug-in in Live), Noise sweep, Snare roll and Crash on the drop.
8. Write to Live
Check the summary under Write to Live will, then click Write to Live. It takes a few seconds for a full track, with a progress bar. If there's already something in the Arrangement on those tracks, Arrange asks before replacing it.
Writing needs a licence: choose Licence…, paste your product key (TTAR-…, or a TTBN bundle key) and click Activate. Everything else works without one.
9. Hear it
Switch to Arrangement View and press Play.
Hearing your loop instead of the arrangement? If Session clips are still playing, Live plays them in place of the Arrangement on those tracks. Stop them, or click Live's orange Back to Arrangement button.
Hearing nothing at all? Open Live › Settings › Audio and choose an Audio Output Device, such as your interface or your Mac's speakers. If the status bar at the bottom of Live's window says the audio engine is off, click that message, or press Cmd+Option+Shift+E to turn it back on.
10. Changed your mind?
Press Cmd+Z in Live. The first Cmd+Z removes the whole arrangement, its automation and locators. A second Cmd+Z removes what Arrange added to your tracks: TT Filter, TT Gain, TT High-pass and Arrange's own tracks. Write again as often as you like; Arrange reuses its devices rather than adding more.
Uninstalling
Set the Control Surface back to None, then delete the app, the Remote Scripts/TranceToolsArrange folder in your Live User Library, and the Samples/TranceTools Arrange folder there (the sounds the extras made).